This tutorial guides you on how to retrieve the necessary information for configuring an OpenID Connect (OIDC) application with Azure Active Directory. Follow the steps below to obtain the Client ID, Client Secret, and essential endpoints used in OIDC authentication.
Prerequisites
-
Access to the Azure Portal with administrative permissions.
-
An OIDC-registered application within Azure Active Directory.
Steps
1. Access the Azure Portal
Visit the Azure Portal and log in with your credentials.
2. Navigate to Azure Active Directory
In the side menu of the Azure Portal, click on Azure Active Directory. This section allows you to manage your identity and access configurations.
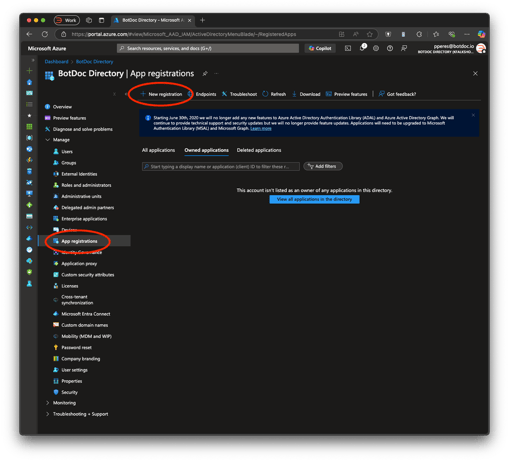
3. Go to App Registrations
In the Azure AD submenu, select App registrations.
Click + New registration.
On the Register an application page:
-
Name: Provide a descriptive name, for example, “BOTDOC-SSO”.
-
Supported account types: Accounts in this organizational directory only (BotDoc Directory only - Single tenant)
-
Redirect URI (required) select WEB and enter: https://botdoc-domain.us.auth0.com/login/callback

Click Register to complete the Registration
4. After Registration
Go to the Authentication section.
Under Select the tokens you would like to be issued by the authorization endpoint, enable:
-
✅ Access tokens (for implicit flows)
-
✅ ID tokens (for implicit and hybrid flows)

5. Configure Token Claims
Go to the Token Configuration section. and click on the “+ Add optional claim”
Select Token Type “ID” and choose “Email, family_name and given_name”

Follow the same steps, but now for “Access”

After everything completed, you should see this page like the one below:

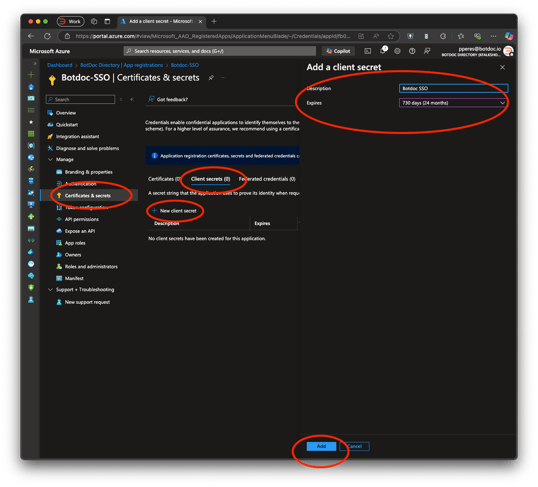
6. Obtain the Client's Secret
To view or create a new client secret:
-
Click on Certificates & secrets.
-
To generate a new secret, click on New client secret.
-
Provide a description and choose the duration of the secret.
-
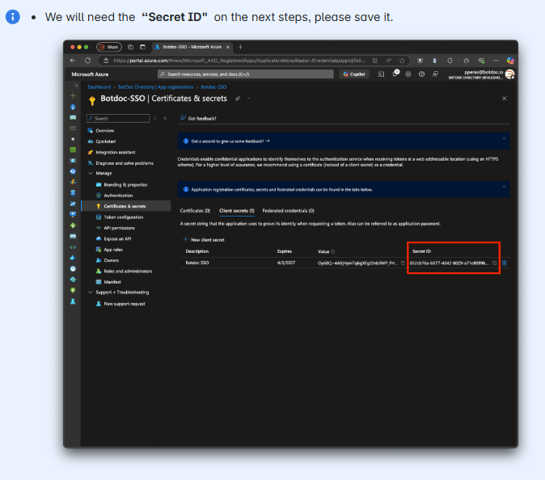
Once created, note down the value of the secret immediately as it will not be shown again.
7. Configure Your SSO Configuration inside Botdoc
Go to My Organization, and under the SSO Configuration, click on Activate Configuration and fill in the fields.
In your SSO configuration screen, you will map:
-
Client ID: This is the Application (client) ID from the Overview page.
-
Client Secret: The secret ID created under Certificates & secrets.
Not the value, but the SECRET ID
-
Issuer:
-
https://login.microsoftonline.com/<tenant_id>/v2.0
-
or https://login.microsoftonline.com/<tenant_id>/common/v2.0
-
-
Authorization Endpoint:
-
https://login.microsoftonline.com/<tenant_id>/oauth2/v2.0/authorize
-
-
Token Endpoint:
-
https://login.microsoftonline.com/<tenant_id>/oauth2/v2.0/token
-
-
UserInfo Endpoint:
-
JWKS URI:
Again, replace <tenant_id> with your actual Directory ID or use common if you want a multi-tenant approach.

After filling in all the information, click on “Save SSO Configuration,” making sure the Activate Configuration is checked.
After saving the information, click on the “Create Connection”

If everything is working, you should see the following page.

You can now test the connection. We recommend opening a new tab and doing the login process without logging out of the account.
8. Finding Configurations
-
Client ID: This is the Application (client) ID from the Overview page.
-
Client Secret: The secret ID created under Certificates & secrets. Created on Step 6
-
Tenant ID: This is the Directory (tenant) ID from the Overview page.
